Everybody likes things which are customized for himself. Advanced users do so by Googling for it and newbie comes to this blog. In the case of Windows most people customize visuals. Some do so for their hobby while others do to show.
Today we'll show you how to change windows welcome screen. Welcome screen customization is easier than you think.
You will need the following things
You can open Registry Editor in the following 3 ways
Step 2: Go to the following registry key in the left pane.
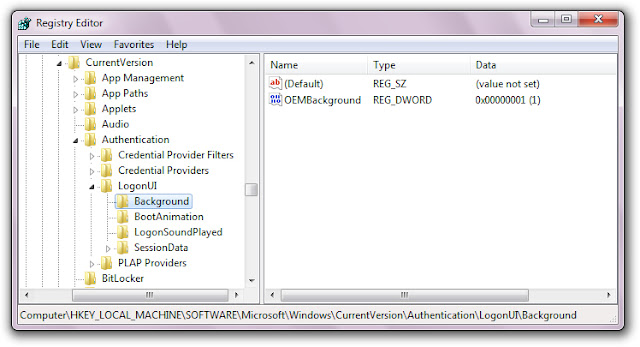
Step 3: Double click on key named OEMBackground and change its value to 1 (If you cannot find the path or the key go ahead and create it, remember OEMBackground is a DWORD)
Download Registry File Here to Automatically perform this step.
You will need a software like 7-Zip to unzip the compressed files

You just enabled the OEM Background functionality. Now browse to the folder
within Windows explorer. Again the folder path may not exist already, so you can go ahead and create required folders (info and backgrounds are generally not present)
Now put in any JPG file with size less than 256 kb in this folder and rename it to BackgroundDefault.jpg. This file will be stretched to fit the screen, so you would want it to match the resolution of your screen so that image doesn’t look bad. You can Reduce Picture Size using Adobe Photo Shop or Microsoft Office Picture Manager.
Note that selecting a new theme in the Appearance and Personalization window will “unset” this registry value. Selecting a theme will change the value of the key to the value stored in the theme’s .ini file, which is probably 0 – if you change your theme, you’ll have to perform this registry tweak again.
It is recommended to use an image having dimensions equal to your desktop resolution. If the image is to small or large in dimensions, it will be stretched to fit. Background image will not be displayed if its size goes beyond 256 KB
Today we'll show you how to change windows welcome screen. Welcome screen customization is easier than you think.
You will need the following things
- A Background Image.
- Basic knowledge of the registry to edit the registry
- 2 minutes or less to demonstrate.
You can open Registry Editor in the following 3 ways
Step 2: Go to the following registry key in the left pane.
HKEY_LOCAL_MACHINE\SOFTWARE\Microsoft\Windows\CurrentVersion\Authentication\LogonUI\Background
Step 3: Double click on key named OEMBackground and change its value to 1 (If you cannot find the path or the key go ahead and create it, remember OEMBackground is a DWORD)
Download Registry File Here to Automatically perform this step.
You will need a software like 7-Zip to unzip the compressed files

You just enabled the OEM Background functionality. Now browse to the folder
C:\Windows\\system32\oobe\info\backgrounds
Now put in any JPG file with size less than 256 kb in this folder and rename it to BackgroundDefault.jpg. This file will be stretched to fit the screen, so you would want it to match the resolution of your screen so that image doesn’t look bad. You can Reduce Picture Size using Adobe Photo Shop or Microsoft Office Picture Manager.
Note that selecting a new theme in the Appearance and Personalization window will “unset” this registry value. Selecting a theme will change the value of the key to the value stored in the theme’s .ini file, which is probably 0 – if you change your theme, you’ll have to perform this registry tweak again.
Keep in mind that
Picture type must be JPG
Picture size must be less than 256 KB
Picture name must be BackgroundDefault.jpg
Picture size must be less than 256 KB
Picture name must be BackgroundDefault.jpg
It is recommended to use an image having dimensions equal to your desktop resolution. If the image is to small or large in dimensions, it will be stretched to fit. Background image will not be displayed if its size goes beyond 256 KB

ConversionConversion EmoticonEmoticon